Written in PHP, Sound is a flexible and open supply on-line accounting software program that enables customers to handle their funds and observe all their payments, charges and bills, mentioning only a few monetary duties.
It is a perfect on-line accounting platform for small companies who can’t afford to accumulate costly accounting software program. Akaunting provides a modern and intuitive interface that features all of the options and controls it’s essential to keep up-to-date in your money flows and occasions.
Dazzling options
Notable options embrace:
- Multi-currency help.
- Visible reporting utilizing charts.
- Provider administration system.
- Potential to ship invoices to shoppers through SMTP protocol (requires an electronic mail server configured on your server).
- Create and handle invoices, payments, and different funds for work in progress.
- Potential to just accept bulk funds.
- Low cost administration system.
- Buyer Abstract.
On this information, we’ll information you thru the set up Sound free self-hosted accounting software program Ubuntu 20.04.
Step 1: Set up LAMP Stack on Ubuntu
Since Sound Prospects and the administrator largely use the interface and require a database server to ensure that all the info to be saved, we have to begin by putting in the LAMP stack. We have already got an in depth information on putting in the LAMP stack on Ubuntu 20.04. That is helpful earlier than you proceed.
Some further PHP modules are required Akaunting software program to work with out issues. Due to this fact, set up the next PHP modules.
$ sudo apt set up libapache2-mod-php php7.4-mysql php7.4-gd php7.4-cli php7.4-imagick php7.4-common php7.4-mysql php7.4-gd php7.4-bcmath php7.4-json php7.4-curl php7.4-zip php7.4-xml php7.4-mbstring php7.4-bz2 php7.4-intl php7.4-imap php7.4-ldap php7.4-xmlrpc php7.4-soap
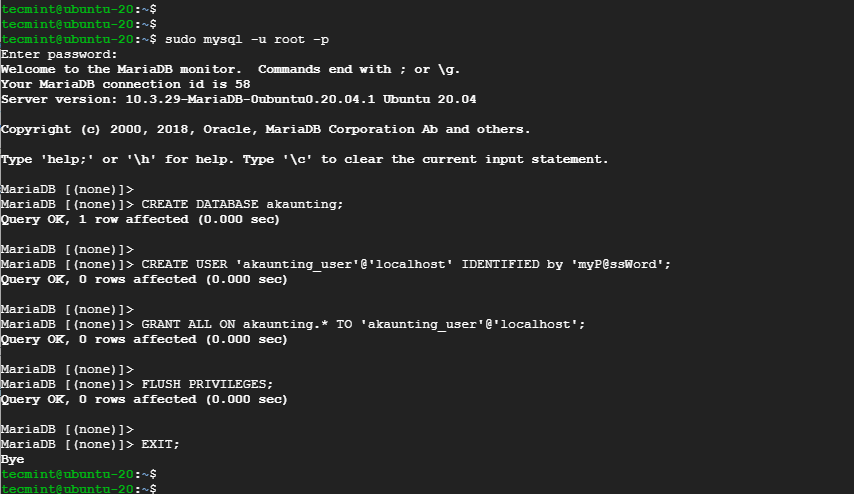
Step 2: Create an Akaunting database
Subsequent, we’re going to create a database Sound On the MariaDB database server. That is the database that Akaunting makes use of to retailer all its information.
Due to this fact, log in to the MariaDB server.
$ sudo mysql -u root -p
Create a database and a database person.
MariaDB [(none)]> CREATE DATABASE akaunting;
MariaDB [(none)]>CREATE USER 'akaunting_user'@'localhost' IDENTIFIED by '[email protected]';
Then grant all rights to the person within the database.
MariaDB [(none)]>GRANT ALL ON akaunting.* TO 'akaunting_user'@'localhost';
Lastly, save your modifications and exit the MariaDB immediate.
MariaDB [(none)]>FLUSH PRIVILEGES;
MariaDB [(none)]>EXIT;
Step 3: Set up the Akaunting software program on Ubuntu
As soon as the database is in place, we’ll subsequent obtain the most recent model Sound which involves the archive to be compressed. You are able to do this through the use of the wget command as proven.
$ wget -O Akaunting.zip https://akaunting.com/obtain.php?model=newest
Subsequent, create a listing within the internet listing,
$ sudo mkdir -p /var/www/akaunting/
After which extract the contents of the compressed archive to a listing.
$ sudo unzip Akaunting.zip -d /var/www/akaunting/
Subsequent, set the possession of the listing for the online information person and group.
$ sudo chown www-data:www-data -R /var/www/akaunting/
And the permissions as follows.
$ sudo chmod -R 755 /var/www/akaunting/
Step 4: Configure Apache Digital Host for Akaunting in Ubuntu
We have to outline a digital host file for the Akaunting web site. This permits Apache to host the location with out conflicts with Apache’s default digital host file.
Comply with these steps to arrange a digital host file along with your favourite textual content editor.
$ sudo vim /and many others/apache2/sites-available/akaunting.conf
Paste the displayed content material. Keep in mind to change yourdomain.com along with your totally configured area or IP tackle of your server.
<VirtualHost *:80>
    ServerName yourdomain.com
    DocumentRoot /var/www/akaunting/

    <Listing /var/www/akaunting/>
       DirectoryIndex index.php
       Choices +FollowSymLinks
       AllowOverride All
       Require all granted
    </Listing>

    ErrorLog ${APACHE_LOG_DIR}/akaunting.error.log
    CustomLog ${APACHE_LOG_DIR}/akaunting.entry.log mixed

</VirtualHost>
Save the modifications and exit the settings file. Then allow the digital host file and the Apache rewrite module.
$ sudo a2ensite akaunting.conf
$ sudo a2enmod rewrite
Moreover, disable the default Apache digital host file.
$ sudo a2dissite 000-default.conf
Restart Apache for the modifications to take impact.
$ sudo systemctl restart apache2
Step 5: Full the set up of Akaunting in Ubuntu
All configurations and settings at the moment are in place. The one step left is to finish the set up with a browser. Launch your browser and go to your server’s IP tackle or Absolutely Certified Area Identify (FQDN).
http://server-IP or area title
The settings web page beneath greets you and prompts you to pick your most well-liked language.
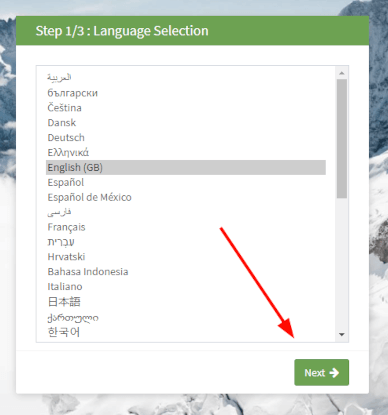
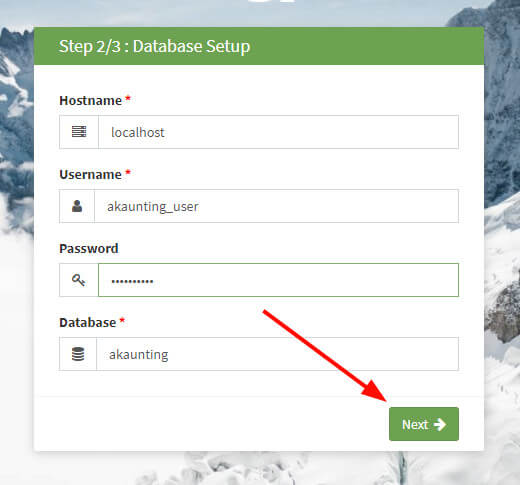
Subsequent, enter the database data that you simply specified if you created the database and click onSubsequent’.
ENTRY: Present publication on the time of writing ( 1.3.17 ) incorporates an error that produces a PHP error that seems within the browser. Right here is an excerpt from the error.
(1/1) ErrorException
Making an attempt to entry array offset on worth of kind int
in ArrayInput.php line 135
Open the workaround ArrayInput.php file.
$ sudo vim akaunting/vendor/symfony/console/Enter/ArrayInput.php
Go to line 135 and alter it:
} elseif ('-' === $key[0]) {
to recipient:
} elseif (isset($key[0]) && '-' === $key[0]) {
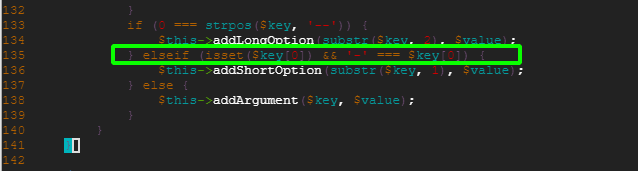
Save the file, after which refresh the set up web page.
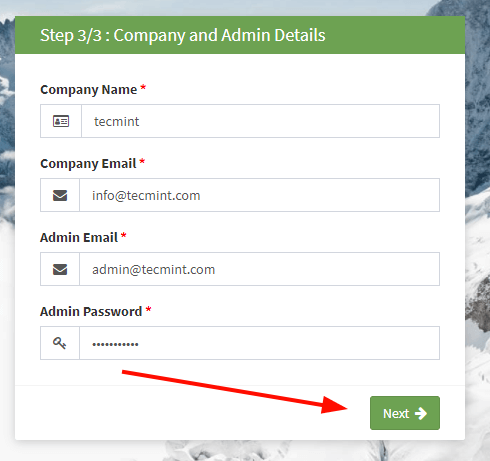
Within the final step, fill within the firm and administrator data and click onSubsequent“.
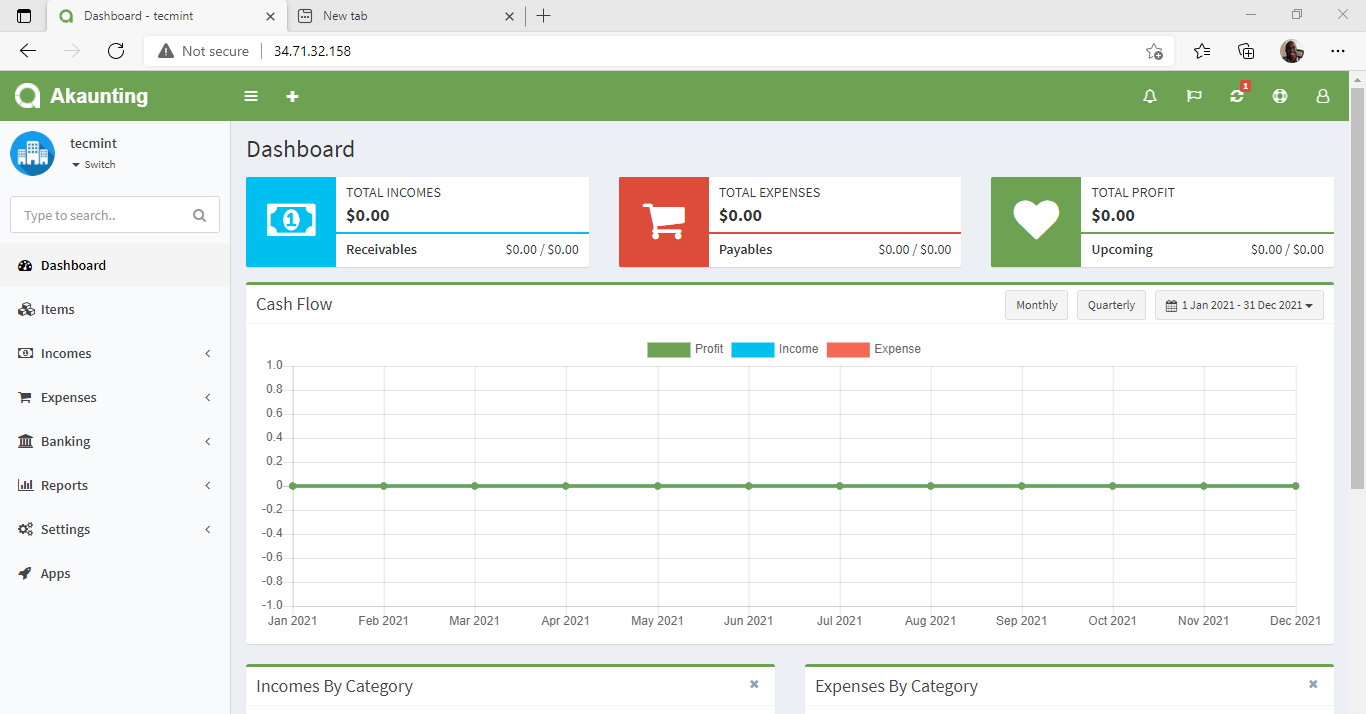
Lastly, the dashboard seems. Right here you may proceed calculations and observe bills.
This may full the set up of this information Akauting software program on Ubuntu 20.04.