NFS (Network file sharing) is a protocol that allows you to share directories and files with other Linux clients on the network. A shared directory is usually created NFS server and the files attached to it.
Client systems attach a directory that is located NFS a server that gives them access to the created files. NFS is handy when you need to share common data between client systems, especially when they are running out of space.
This guide consists of 2 main parts: Installation and configuration NFS server on Ubuntu 18.04 / 20.04 and installation NFS client In a Linux client system.
Installing and configuring an NFS server on Ubuntu
Install and configure NFS server, follow the steps below.
Step 1: Install NFS Kernel Server on Ubuntu
The first step is to install nfs-kernel-server on the server. But before we do this, we first update the system packages with the next apt command.
$ sudo apt update
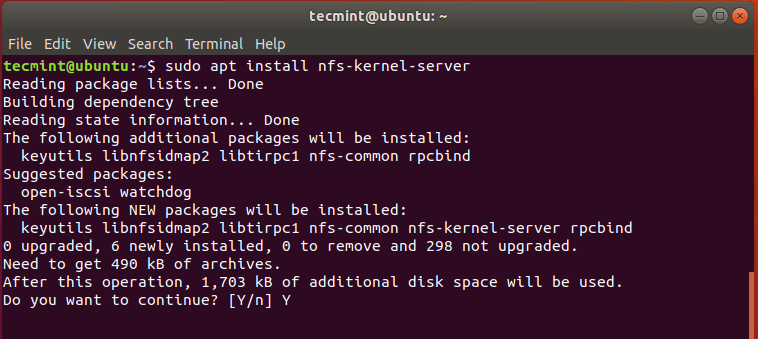
When the upgrade is complete, continue and install nfs-kernel-server as shown below the package. This stores additional packages such as nfs-common and rpcbind which are equally important in determining file sharing.
$ sudo apt install nfs-kernel-server
Step 2: Create an NFS export directory
The second step is to create a directory that is shared among client systems. This is also called an export directory, and in this directory we later create files that client systems can access.
Run the command below to specify the NFS installation directory name.
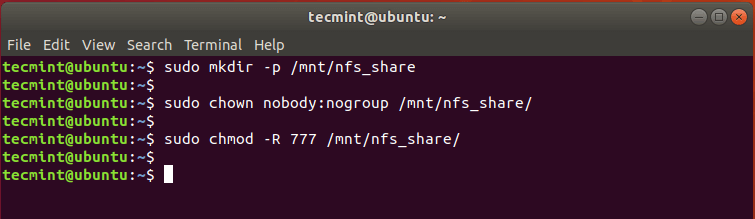
$ sudo mkdir -p /mnt/nfs_share
Because we want all client computers to have access to the shared directory, remove all restrictions on directory access.
$ sudo chown -R nobody:nogroup /mnt/nfs_share/
You can also adjust file permissions to your liking. Here we have granted read, write and execute rights to all the contents of the directory.
$ sudo chmod 777 /mnt/nfs_share/
Step 3: Grant NFS share access to client systems
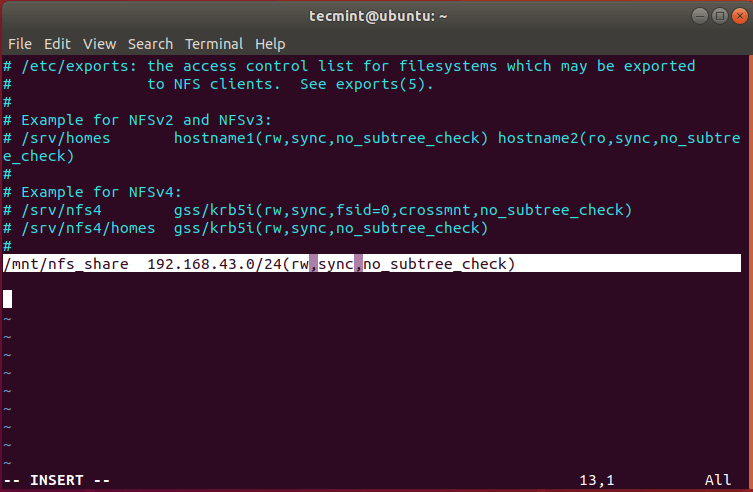
NFS server permissions are specified / etc / export file. So open the file with your favorite text editor:
$ sudo vim /etc/exports
You can grant access to a single client, multiple clients, or configure an entire subnet.
In this guide, we have given the entire subnet access to the NFS share.
/mnt/nfs_share 192.168.43.0/24(rw,sync,no_subtree_check)
An explanation of the options used in the above command.
- rw: Stands for reading / writing.
- syncronizing: Requires changes to be written to disk before they can be applied.
- No_subtree_check: Removes the subtree check.
To grant access to a single client, use the syntax:
/mnt/nfs_share client_IP_1 (re,sync,no_subtree_check)
For multiple clients, specify each client in a separate file:
/mnt/nfs_share  client_IP_1 (re,sync,no_subtree_check)
/mnt/nfs_share  client_IP_2 (re,sync,no_subtree_check)
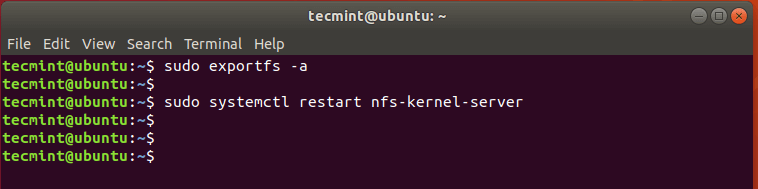
Step 4: Export to NFS Share Directory
After you grant access to the primary client systems, export the NFS share directory and restart the NFS kernel server for the changes to take effect.
$ sudo exportfs -a
$ sudo systemctl restart nfs-kernel-server
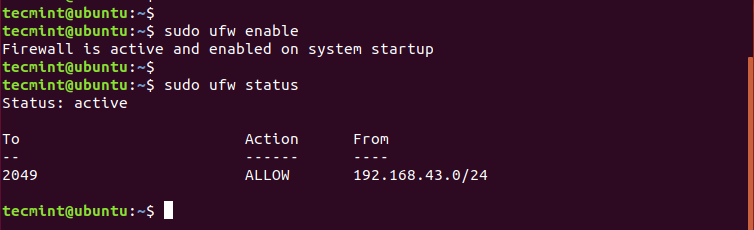
Step 5: Allow NFS connection through the firewall
In order for a client to use an NFS share, you must allow access through a firewall, otherwise it will be impossible to use and install a common directory. To accomplish this, run the command:
$ sudo ufw allow from 192.168.43.0/24 to any port nfs
Recharge or re-enable the firewall (if it was turned off) and check the firewall status. Port 2049, which is the default file share, should open.
$ sudo ufw enable
$ sudo ufw status
Install NFS Client on client systems
We have completed the installation and configuration of the NFS service on the server, now installed on the NFS client system.
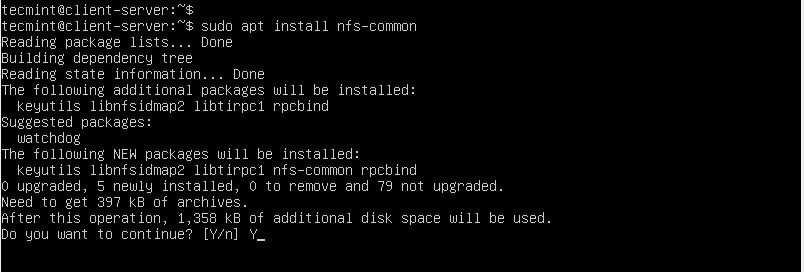
Step 1: Install the NFS Common Package
According to the standard, start by updating system packages and archives above all else.
$ sudo apt update
Install next nfs-common packages as shown in the picture.
$ sudo apt install nfs-common
Step 2: Create an NFS mount point for the client
Next, you need to create an anchor point to which you connect the nfs share from the NFS server. To do this, run the command:
$ sudo mkdir -p /mnt/nfs_clientshare
Step 3: Install NFS Share on the client system
The final step is to install the NFS share shared by the NFS server. This allows the client system to access the shared directory.
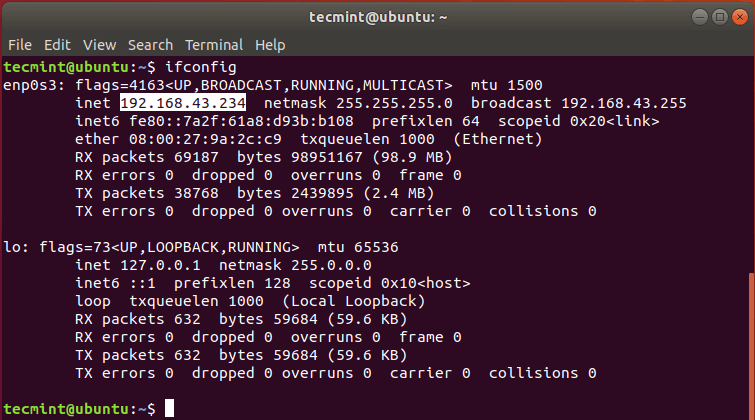
Check the IP address of the NFS server with the ifconfig command.
$ ifconfig
To accomplish this, run the command:
$ sudo mount 192.168.43.234:/mnt/nfs_share /mnt/nfs_clientshare
Step 4: Test the NFS partition on the client system
To ensure that our NFS configuration works, we plan to create a few files in the NFS share directory on the server.
$ cd /mnt/nfs_share/
$ touch file1.txt file2.txt file3.txt
Now go back to the NFS client system and check if the files exist.
$ ls -l /mnt/nfs_clientshare/
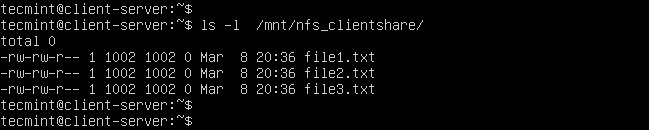
Glorious! The output confirms that we can access the files you just created on the NFS server!
And that’s about it. In this guide, we guided you through the installation and assembly NFS server on Ubuntu 18.04 and Ubuntu 20.04. NFS It is rarely used today and is set in favor of a more robust and secure Samba sharing protocol.